Oh, the humble cardboard box! Before you toss it into the recycling bin, consider its potential to be transformed into magical tools and décor for your witchy abode. With a little creativity and a few simple supplies, you can turn trash into witchy treasure. Here are three DIY crafts perfect for using up those leftover cardboard boxes:
Leftover delivery boxes
We all have them – those leftover delivery boxes, cereal boxes, or appliance packaging. Instead of letting them gather dust or heading straight for the recycling bin, let’s infuse them with some magic! Repurposing is a wonderfully sustainable and resourceful practice, aligning perfectly with a witch’s respect for the earth.
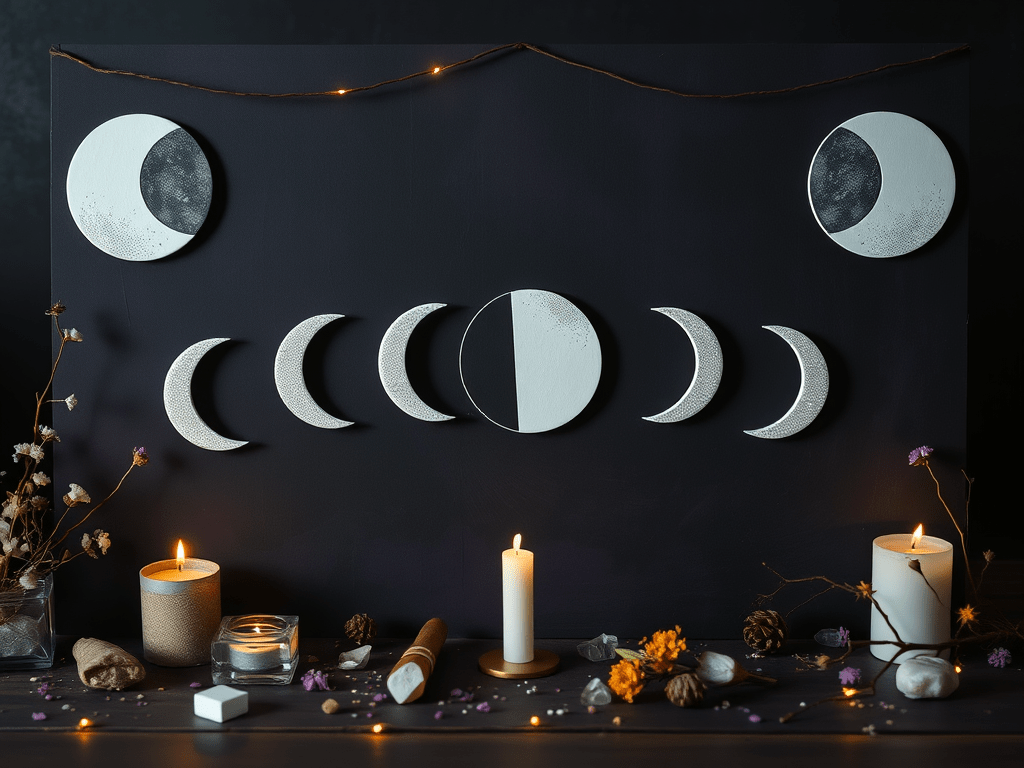
1. Lunar Phase Altar Display
Create a beautiful and ethereal display for your altar, perfect for tracking the moon’s cycles or honoring the Goddess. This piece can be painted, decorated, and even hold small offerings.
You’ll Need:
- A medium to large flat piece of sturdy cardboard (e.g., from a delivery box)
- Scissors or a craft knife
- Pencil
- Compass or round objects (various sizes) for tracing circles
- Black acrylic paint (or a dark blue, purple, etc.)
- White or silver acrylic paint
- Paintbrushes
- Optional: Glitter, glow-in-the-dark paint, craft glue, small decorative elements (like tiny crystals or dried flowers)
Instructions:
- Cut the Base: Cut out a rectangular or oval piece of cardboard for your base. This will be the “sky” backdrop for your moon phases.
- Create Moon Shapes: On a separate piece of cardboard, trace several circles of the same size. You’ll need at least 5 for a full lunar cycle (new, crescent, quarter, gibbous, full – and then repeating back). Carefully cut these circles out.
- Shape the Phases:
- Leave one circle whole for the Full Moon.
- For the New Moon, paint a circle solid black.
- For the Crescent and Gibbous moons, carefully cut away portions of the circles to represent these phases. You can also achieve this with paint.
- For the Quarter Moon, cut half of a circle away.
- Paint Your Sky: Paint your base cardboard piece a deep black, dark blue, or mystical purple. Let it dry completely.
- Paint Your Moons: Paint the visible parts of your moon cut-outs white or silver. For the new moon, paint it solid black. Let them dry.
- Assemble and Decorate: Once everything is dry, arrange your moon phases across your painted sky base. You can glue them down for a permanent display. Add stars with white or silver paint, or sprinkle some glitter while the paint is wet. You might paint a small celestial body or a constellation.
- Optional Stand: If you want it to stand upright, cut a small rectangular strip of cardboard, fold it into a triangle or ‘L’ shape, and glue it to the back of your display as a kickstand.
2. Spell Scroll Holder / Incantation Box
Keep your written spells, intentions, or incantations safe and discreet in a beautifully decorated box. This is perfect for manifesting, protecting your workings, or simply organizing your magical papers.
You’ll Need:
- A small to medium-sized cardboard box with a lid (like a shoebox, cereal box, or gift box)
- Scissors or craft knife
- Craft glue (PVA glue works well)
- Paint (acrylics in your desired colors – black, purple, green, brown, metallic)
- Paintbrushes
- Optional: Decorative paper (scrapbook paper, old book pages, botanical prints), fabric scraps, twine, beads, dried herbs, small twigs, markers or paint pens for sigils/symbols.
Instructions:
- Prepare the Box: Ensure your box is clean and sturdy. If it’s a cereal box, you’ll need to cut and glue it into a rectangular box shape. You can also reinforce corners with extra glue or masking tape.
- Prime and Paint: Paint the entire box, inside and out (if desired), with a base color. Black, dark green, or deep purple are excellent witchy choices. Let dry.
- Decorate the Exterior: This is where the magic happens!
- Celestial: Paint stars, moons, suns, or constellations.
- Nature: Glue on dried leaves, pressed flowers, small twigs, or natural fibers.
- Mystical Symbols: Draw or paint sigils, runes, pentagrams, or other magical symbols relevant to your practice. Use metallic paints for a shimmering effect.
- Textured: Glue on fabric scraps, twine, or even rough sandpaper for interesting textures before painting over them.
- Paper Layers: Cut out images from magazines, old books, or print out witchy motifs and glue them onto the box using decoupage techniques (glue, then coat with more glue).
- Lid Decoration: Give the lid special attention. You might focus a central symbol there, or create a unique pattern.
- Optional Interior: Line the inside of the box with soft fabric or decorative paper to create a luxurious and protective space for your scrolls.
- Seal with Intention: Once complete, hold your box and imbue it with your intention. Visualize it as a protective container for your magical workings.
3. “Witch’s Apothecary” Storage Drawers
Transform a stack of small cardboard boxes into a functional and charming set of drawers for storing dried herbs, crystals, trinkets, or tiny spell components.
You’ll Need:
- Several small, sturdy cardboard boxes (e.g., individual tea boxes, small craft boxes, or cut-down cereal boxes – aim for similar sizes)
- One slightly larger, open-faced cardboard box that can act as the “frame” for your drawers (like a shoebox with the lid removed and one long side cut off)
- Scissors or craft knife
- Strong craft glue or hot glue gun
- Paint (acrylics, various colors)
- Paintbrushes
- Optional: Small wooden beads, buttons, or corks for drawer pulls; decorative paper, labels, markers.
Instructions:
- Prepare the Drawers: Ensure your small boxes are clean and that their open ends will serve as the “front” of the drawers. If they are cereal boxes, you’ll need to cut them down and glue them into small rectangular prisms.
- Create the Frame: Take your larger box. Cut off the top lid and one long side to create an open-fronted “shelf” unit. Test fit your smaller boxes inside to ensure they slide in and out like drawers. You might need to adjust the height or width of your small boxes.
- Assemble the Structure: Using strong glue, assemble the frame. You can create horizontal dividers with extra cardboard if your frame box is very tall and you want multiple rows of drawers. Glue these dividers securely.
- Paint Everything: Paint the frame and all the individual drawers in your chosen colors. Earthy tones, deep greens, browns, or even a distressed black look wonderful. You can paint each drawer a different complementary color. Let dry.
- Add Drawer Pulls: Glue a bead, button, or small piece of cork to the center of each drawer front to act as a pull handle.
- Decorate and Label:
- Decorate the outside of the frame with painted symbols, botanical motifs, or even a faux wood grain.
- On the front of each drawer, paint or glue on labels for what you plan to store inside (e.g., “Lavender,” “Amethyst,” “Charms,” “Protection Herbs”). Use a nice font or hand-letter your labels.
- You can also add small painted details like vines, stars, or tiny sigils to the drawer fronts.
- Fill and Organize: Once completely dry and assembled, fill your new apothecary drawers with your magical ingredients and enjoy your organized witchy space!
These cardboard crafts are not only budget-friendly and sustainable, but they also offer a wonderful opportunity to infuse your personal magic and creativity into your witchy practice. Happy crafting!


Leave a comment