
The magical potential of cardboard boxes extends well beyond altars and storage! With a bit of cutting, gluing, and painting, those humble boxes can become stunning pieces of witchy wall decor, infusing your space with personalized energy and aesthetic charm. Here are three DIY wall decor crafts to try:
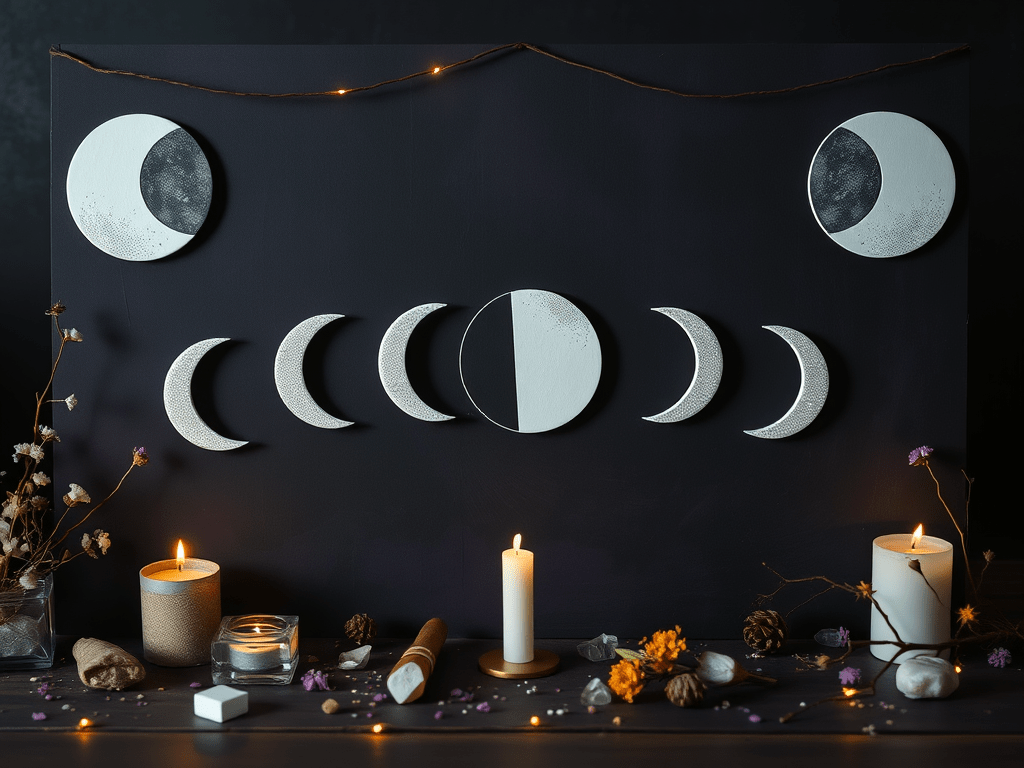
1. The Triple Moon Goddess Silhouette
The Triple Moon symbol is a powerful representation of the Maiden, Mother, and Crone, embodying the waxing, full, and waning moon phases and the divine feminine. Create a striking silhouette for your wall.
You’ll Need:
- A large, sturdy piece of flat cardboard (e.g., from a moving box or appliance box)
- Pencil
- Compass or various-sized round objects (plates, bowls) for tracing circles
- Scissors or a craft knife (a fresh blade is best for clean cuts)
- Black acrylic paint (or a deep dark color like indigo or forest green)
- Paintbrush
- Optional: White or silver paint for stars/details, glitter, strong adhesive for hanging (e.g., Command Strips, mounting tape)
Instructions:
- Sketch Your Design: On your cardboard, draw the Triple Moon symbol. Start with a large central circle for the full moon. Then, draw two crescent shapes on either side, facing outwards, so they connect to the central circle. Aim for symmetry, but a little rustic charm is perfectly witchy!
- Cut It Out: Carefully cut out your Triple Moon shape. Take your time to get clean edges, especially with the crescents.
- Paint It Black (or Dark): Paint the entire cardboard cutout a solid black. This creates a strong silhouette effect. You can do multiple coats for an even finish. Let it dry completely.
- Add Details (Optional): Once dry, you can add subtle details using white or silver paint. Think tiny dots for stars, a subtle shimmer of glitter, or even delicate swirling lines within the moons.
- Hang with Intention: Once completely dry, hang your Triple Moon Goddess silhouette on your wall. As you place it, visualize it infusing your space with feminine energy, intuition, and cyclical wisdom.
2. Elemental Rune/Sigil Wall Plaques
Create a set of small, dedicated plaques, each representing an element or a specific magical intention, adorned with a rune, sigil, or symbol. These can be hung individually or arranged as a powerful grid.
You’ll Need:
- Medium-weight cardboard (e.g., from cereal boxes, or smaller delivery boxes)
- Ruler
- Pencil
- Scissors or craft knife
- Various acrylic paints (e.g., earthy tones for Earth, reds/oranges for Fire, blues for Water, whites/greys for Air)
- Paintbrushes
- Fine-tipped marker or paint pen
- Twine or string for hanging
- Hole punch or skewer
Instructions:
- Cut the Plaques: Decide on your plaque shape (squares, circles, rectangles, or even shield shapes). Cut out several pieces of cardboard to be your plaques. Aim for at least four if you’re doing elemental themes.
- Prepare for Hanging: For each plaque, use a hole punch or skewer to create two holes at the top edge, about an inch apart.
- Paint the Elemental Bases: Paint each plaque a color that represents its element:
- Earth: Greens, browns, deep yellows.
- Air: Whites, light greys, sky blues.
- Fire: Reds, oranges, vibrant yellows.
- Water: Deep blues, turquoises, silvers.
- (Optional Spirit/Ether: Purples, blacks, iridescent colors). Let them dry completely.
- Draw Your Symbols: Once the paint is dry, use a pencil to lightly sketch your chosen rune, sigil, or elemental symbol onto each plaque.
- Earth: Tree, mountain, standing stone, Algiz rune (protection).
- Air: Feather, swirling wind, bird, Ansuz rune (communication).
- Fire: Flame, sun, lightning bolt, Sowilo rune (success, energy).
- Water: Wave, moon, flowing river, Laguz rune (intuition, flow).
- Spirit: Pentagram, eye symbol, or a personal sigil.
- Detail with Paint/Marker: Go over your sketched symbols with a fine-tipped marker or a contrasting paint color. You can add texture with dots or lines.
- Thread and Hang: Cut a length of twine or string for each plaque. Thread it through the two holes from the front, bringing the ends together at the back, and tie a knot to create a hanging loop.
- Charge and Display: As you hang each plaque, focus on the energy of the element or symbol it represents, imbuing it with your intention to bring that energy into your space.
3. Cosmic Star & Sunburst Wall Art
Create dynamic wall art inspired by the cosmos. This project allows for abstract shapes and layered dimensions, perfect for adding a celestial touch to your witchy aesthetic.
You’ll Need:
- Various pieces of cardboard (different thicknesses can add interest)
- Pencil
- Scissors or craft knife
- Craft glue or hot glue gun
- Paint (metallic golds, silvers, copper, deep blues, purples, black)
- Paintbrushes
- Optional: Glitter, sequins, small mirrors, clear acrylic sealant spray
Instructions:
- Cut Basic Shapes: Cut out several star shapes, sun shapes (circles with radiating points), and abstract “burst” or “ray” shapes from your cardboard. Make them in varying sizes. You can freehand these for a more organic, whimsical look.
- Layer and Build: Begin to layer your shapes. For example, glue a smaller star on top of a larger one, or a sunburst behind a central star. Create depth by gluing smaller pieces onto larger ones. You can even cut strips of cardboard, fold them, and glue them on end to create raised textures.
- Prime (Optional): If your cardboard has print, you might want to give it a quick coat of primer or a solid base color like black or white first.
- Paint Your Cosmos: Paint your layered creation. Use metallic golds for suns, silvers for moons and stars, and deep blues or purples for cosmic backgrounds. You can blend colors directly on the cardboard for a nebulae effect. Don’t be afraid to experiment with splashes, streaks, and dots for stars.
- Add Sparkle (Optional): While the paint is still wet, sprinkle glitter, or glue on sequins or tiny mirrors to catch the light.
- Seal and Hang: Once all the paint and glue are completely dry, you can spray a clear acrylic sealant over your piece to protect the paint and glitter. Attach a hanging loop to the back, or use strong mounting tape to affix it directly to your wall.
- Infuse with Light: As you hang your cosmic creation, envision it bringing the expansive energy of the universe, intuition, and illumination into your sacred space.
These crafts prove that magic isn’t about expensive supplies, but about intention, creativity, and transforming the mundane into the mystical. Enjoy bringing more witchy charm to your walls!


Leave a comment